
Russian visa for Norwegians
- Step 1. Know your travel dates and visa type.
- Russian Tourist visa for Norwegians
- Russian Business and Humanitarian visa for Norwegians
- Russian Private visa for Norwegians
- Russian Student visa for Norwegians
- Russian Transit visa for Norwegians
- Step 2. Collect the list of documents, and get your travel support
- Step 3. Apply for visa and pay the fees
- Step 4. Receive your passport and check visa
- Step 5. Arrive to Russia and get registration
- Some final tips:

Russia has long become a popular travel destination for Norwegian citizens. This country has a lot to offer for any type of travelers. The first question you might have is:
Do Norwegians need a visa to Russia?
Yes, they do!
But don’t worry, we’ll help you overcome this challenge in an easy and efficient way. Follow our step-to-step guide to know which visa you need, which documents to collect, where and how to apply for it, how much it will cost and how long the process will last.
Step 1. Know your travel dates and visa type.
Select the dates for your travel, and think about the duration and purpose of your trip. Read on to know the main Russian visa types and their characteristics. Remember that you don’t need to buy tickets, or make any non-refundable bookings in advance.
Russian Tourist visa for Norwegians
- Duration of your trip – no longer than 30 days
- Number of planned entries to Russia – single, double
- Your travel purposes are:
- familiarizing with fantastic Russian sights
- exploring the Far East cycling, driving or hiking (Autoturism required for driving by car)
- experiencing Trans-Siberian railway tours
- resting in sports or health resorts
- attending concerts, festivals, exhibitions etc.
- cruising on liners entering Russian ports (for tourists traveling in organized groups no visa is needed for up to 72 hours)
- going to medical consultations or tests, or attending short business meetings (Aim tourism required)
- Basis for visa: Invitation from a registered Russian tour operator
Russian Business and Humanitarian visa for Norwegians
- Duration of your trip – no longer than 90 days out of 180. Visas can be valid from 30 days to 5 years.
- Number of entries – single, double or multiple
- Your travel purposes are:
- looking for business partners
- attending business meetings, seminars, fairs, exhibitions conferences and other events
- negotiating and signing contracts
- purchasing goods and services
- investing into Russian business
- doing short-term commercial jobs (Commercial purpose)
- attending social, religious, sports, political, charity and other types of events (humanitarian visa type)
- driving passenger or cargo vehicles (Driver purpose. A document proving professional occupation from Norway is required)
- plane, railway or cruise ships crew members (Crew member or pilot purpose. A document proving professional occupation in Norway is required)
- providing maintenance works, or trainings on the use of machinery (Technical maintenance purpose)
- journalists covering specific events in Russia (a document proving professional occupation from Norway is required)
Basis for visa: Invitation from the Russian company, or invitation issued by the Ministry of Internal or Foreign Affairs of Russia upon request of the Russian company
Russian Private visa for Norwegians
- Duration of your trip – up to 90 days
- Number of entries – single, double
- Your travel purposes are:
- Visiting relatives or friends residing in the Russian Federation
- Basis for visa: Invitation from the Ministry of Internal Affairs of Russia, granted upon request of your Russian host
Russian Student visa for Norwegians
- Duration of your trip – 90 days and above, depending on your study course. This visa is issued for 90 days with possibility to extend it while in Russia, if required by the study course.
- Number of entries – single, multiple
- Your travel purposes are:
- studying at a Russian educational institution
- Basis for visa – Invitation from the Ministry of Internal Affairs of Russia, granted upon request of a Russian school
Russian Work visa for Norwegians
- Duration of your trip – 90 days and above, depending on your employment contract. This visa is issued for 90 days with possibility to extend it while in Russia. If the applicant is invited as a Highly Qualified Expert he’s granted a 3 years multiple entry work visa at once, with possibility of further extension in Russia.
- Number of entries – single, multiple
- Your travel purposes are:
- doing paid work under an official contract for a Russian employer
- Basis for visa – invitation from the Russian Ministry of Internal Affairs, granted upon request of your Russian employer
Russian E-Visa for Norwegians
- Duration of your trip – no longer than 8 days out of 30
- Number of entries – single
- Your travel purposes are:
- standard tourism, sightseeing, traveling only in specified areas, namely one of the 3 regions: Saint Petersburg and Leningrad Region, Kaliningrad and Kaliningrad Region, the Far East and Vladivostok.
- Basis for visa – filled electronic form. The form should be filled not later than 4 days before your trip completely and without mistakes. If you want to get professional assistance in filling the form, get it here: Contact Visando
Russian Transit visa for Norwegians
- Duration of your trip – up to 3 days for connections by air, up to 10 days for crossing by road or railway
- Number of entries – single, double
- Your travel purpose is:
- travel through Russia to enter another country
- Basis for visa – tickets of entry and exit from Russia
Important: If you make connection by airway you don’t need a visa, providing if you stay in transit zone without the need to go through passport control. Otherwise, you require transit visa.
If you travel to Kazakhstan or Belarus with connection in Russia you need transit visa.
Step 2. Collect the list of documents, and get your travel support
On the first step you have decided on the duration of your trip, and selected the corresponding to your travel purposes visa type. Now it’s time to collect a set of documents for application. This includes:
- Original national passport with minimum 2 blank visa pages, valid at least 6 months beyond the visa expiry date
- Visa application form filled at visa.kdmid.ru. After you complete it, print on both sides, sign and date personally in the designated area.
- Recent color photograph 3.5 cm x 4.5 cm of true likeness. Taken not earlier than 6 months ago, on a white background, no shades or head coverings, printed on photographic paper. Glue the photo in the marked area in your visa form. Check full photo specifications here: Russian visa photo requirements
- Invitation for an entry to Russia.
- For Tourist visa get a tourist confirmation from the registered Russian tour operator. You can get if from us in 10 min: Get tourist confirmation It is sent in a scan to your email after the order is made, print it and use for application
- For Private visa your Russian host should solicit an invitation at the Ministry of Internal Affairs of Russia, Department of migration affairs. The process is quite dreary and will take around 20 working days. If you can’t wait long, consider going on a tourist visa instead
- For Business visa your Russian partners should make you either a written invitation on their letterhead, signed and sealed; or solicit an invitation at the Ministry of Internal Affairs, which will take up to 20 working days. If they can’t provide you with one, order it here: Get Business travel support
- For Student visa your Russian university or school should solicit an invitation at the Ministry of internal Affairs. It might take up to 1.5 months. Currently they are issued in electronic form, you’ll simply need to print it out to apply
- For Work visa your Russian employer should solicit an official invitation at the Ministry of Internal Affairs of Russia. It might take up to 2 months. The invitations are accepted only in paper original. Don’t forget to ask for a delivery.
- For E-visa or transit visa no invitations are required
- Medical Insurance policy. It should be valid on the territory of Russia and cover your whole trip.
- Extra document for work/student visa – a negative HIV-test if you are planning to stay over 90 days in Russia. The test should be taken via blood sample in any local clinic not earlier than 90 days before the application.
Step 3. Apply for visa and pay the fees
We’ve finally come to the application itself. By now you should have gathered all the required documents and have them ready.
So, where should you apply for visa? There are two options to consider:
- Directly at the Russian Consular Division in Oslo, Kirkenes or Barentsburg in person by booking an appointment at http://oslo.kdmid.ru/queue-en/ or http://kirkenes.kdmid.ru/queue/
- At one of licensed visa centers in Kirkenes or Oslo in person, by prior appointment, or without it, or by post
Visa centers facilitate the processing of visa applications, and if you use their services you will find it much easier and comfortable.
For more convenience you can even choose to apply by post sending documents directly to the visa center. Address the envelope to one of them:
| POSTAL ADDRESS in OSLO: | POSTAL ADDRESS in KIRKENES: |
| TRAVEL ASSISTANCE SERVICES AS (TASS) ASFridtjof Nansens plass 90160 Oslo | TRAVEL ASSISTANCE SERVICES (TASS) ASPostboks 2229915 Kirkenes |
Include an empty envelope with your return address indicated on it.
Remember that you have to pay the visa fee, when submitting your documents. If you apply at the consulate it will include only Consular fee, if you apply at the Visa center, you’ll pay extra for service fee, as well as postal application or delivery services. See details below
CONSULAR FEE
| Type of visa – number of entries | Normal processing (20 business days) | Urgent processing (3 business days) |
| Single entry | 680 NOK | 1360 NOK |
| Double entry | 1088 NOK | 2176 NOK |
| Multiple entry | 2040 NOK | 4080 NOK |
If you apply at the Consular departments, payment is made at the time of submission of document by credit card or in cash.
VISA CENTER FEES
- To apply via visa center you’ll need to pay visa fees, which amount varies depending on the visa type and can be known at the website of the center. Additionally you’ll pay service fee, which is 300 NOK. Standard processing takes 4-10 business days, Urgent – 1-3 business days
- After and if you submit documents by post, you will receive the invoice for payment of visa fees. Applicants also pay postal application fee:
| Number of passportsIn a single envelope | Cost of postalProcessing | ExpressReturn delivery | Sending by registered mail | Total urgent/ normal fee |
| 1 passport | 450 NOK | 900 NOK | 200 NOK | 1350/650 NOK |
| From 2 to 5 passports | 650 NOK | 1200 NOK | 300 NOK | 1850/850 NOK |
- if you apply in person at the visa center but want passport delivered back you can pay for secure courier delivery 200 NOK more.
Get the addresses and other contacts by this link: Russian Consulates and Embassies
Note: E-visa applicants don’t need to pay any visa fees.
Step 4. Receive your passport and check visa
After you apply for the visa, you should wait the stipulated amount of time and collect your passport, unless you have applied by post or ordered courier delivery back.
Please check carefully what’s indicated in your visa, especially visa validity and number of entries.

If everything’s okay, you can pack your bags and get ready to travel. Don’t forget to take your passport, hotel bookings, and invitation with you.
Step 5. Arrive to Russia and get registration
After you have arrived to Russia, you’ll need to obtain two more documents for your stay:
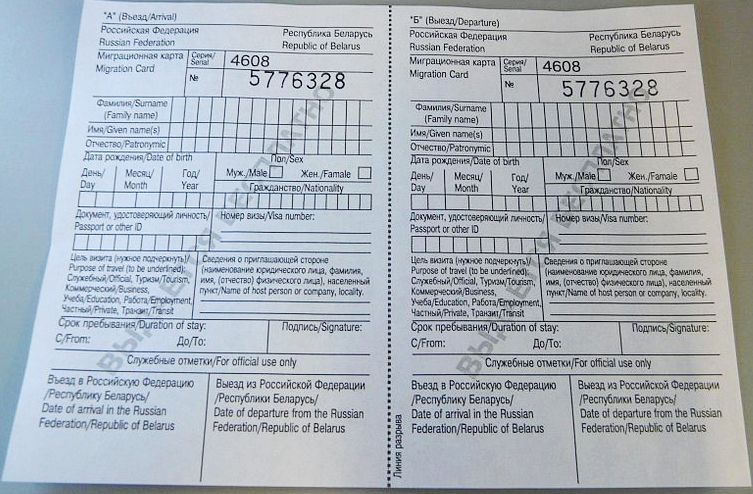
- Migration Card
- Registration
The first is usually distributed by flight attendants on the plane, or handed by the immigration officer at control point. You’ll need to fill it with details of your trip – dates, places of stay etc. in Russian or English in block letters. It will be then stamped by the officer, and you’ll be given one part of the document to save. When you leave Russia, you’ll be asked to submit it back at the control.
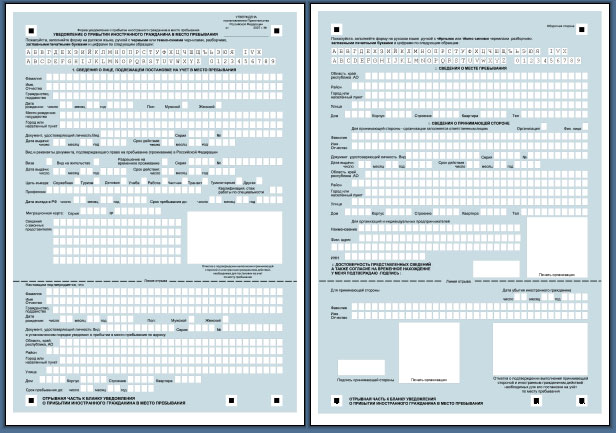
Registration is another document proving your legal stay in Russia, which is normally made by the hotels where you stay, or by the owner of the apartment. A foreign individual staying over 7 working days in Russia needs to get registered at the post or police office in the district of his accommodation. Your presence isn’t necessary at this procedure. The owner of apartment can do it by himself bringing copies of your visa and migration card to the police or post office. Make sure you contact your Russian host in advance to ask for this service. Registration is not often checked, but it’s still recommended to have it.
I hope that now you have a very clear idea on how to get your Russian visa and plan your trip.
Some final tips:
- Know the opening hours in travel attractions you are willing to visit. Some have their specific schedules
- Learn to navigate Moscow underground or use other transportation system. Download useful apps to your smartphone for online taxi services and transport maps
- Carry along your passport, migration card and registration. Also, make photos of them and save on your phone
- Don’t get too paranoid about pickpockets or robbers. Russia is a very safe country for travelers. Still you should certainly keep an eye on your stuff in public places
- Research the ongoing cultural events and bookmark them in advance. There are lots of interesting things going on in Russian cities
- Try to learn a few Russian words. Locals will appreciate your efforts and treat you especially friendly
- Don’t be afraid to ask for help. People in Russia are eager to provide assistance. In big cities most young people know English well. Anyways, it’s a good idea to install a translator or dictionary app to your smartphone
- Enjoy your trip and take lots of awesome photos!